
Table of Contents
- → Managing Contacts in the Mobile App
- How to access the Contacts page
- How to add a new contact
- Importing contacts from the web app
- → Why Your Contact List May Look Blank
- How the Contacts page displays contacts
- How to search for contacts
- → Keeping Contacts Visible in Your List
- How to mark contacts as favorites
- Why favorites appear on the Contacts page
- → Creating Group Conversations in the Mobile App
- How to start a new conversation
- How to search for and select contacts
- How to name a group conversation
- How to send your first message
- → Naming Group Conversations
- Why some group conversations display as “Group Message”
- How to rename a group conversation
- Best practices for group conversation names
- → How to Send Pictures in the Mobile App
- How to send a picture from your Photo Library
- How to take & send a new picture directly from the mobile app
- Best practices for using picture messaging in the mobile app
Managing Contacts in the Mobile App
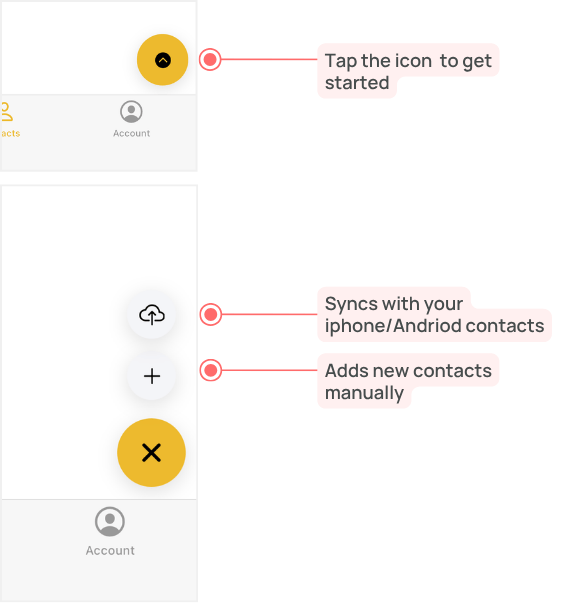
Contacts can be managed from the Contacts page in the TextBetter mobile app.
To open the Contacts page, tap the Contacts icon in the bottom navigation menu.
How to Add a Contact
To add a new contact from the mobile app:
- Tap the Contacts icon in the bottom navigation menu.
- Tap the yellow caret button in the bottom-right corner.
- Tap the plus sign.
- Enter the contact details on the contact page.
- Tap Update to save the contact.
Contacts added in the mobile app are added individually.
💡 Pro Tip for Importing Large Contact Lists
If you need to add a large list of contacts, log in to the TextBetter web app and upload or import your contacts using a spreadsheet. The web app and mobile app sync automatically, so contacts imported through the web app will also be available in the mobile app.
Why Your Contact List May Look Blank
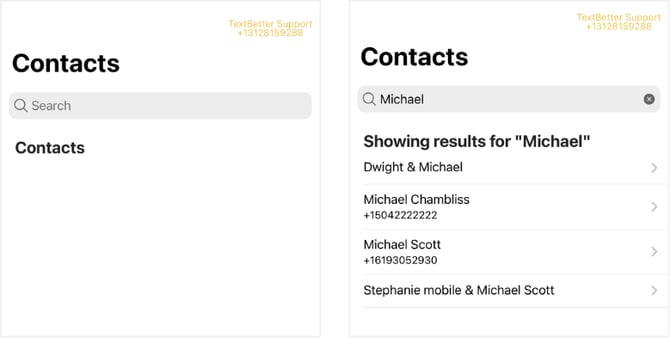
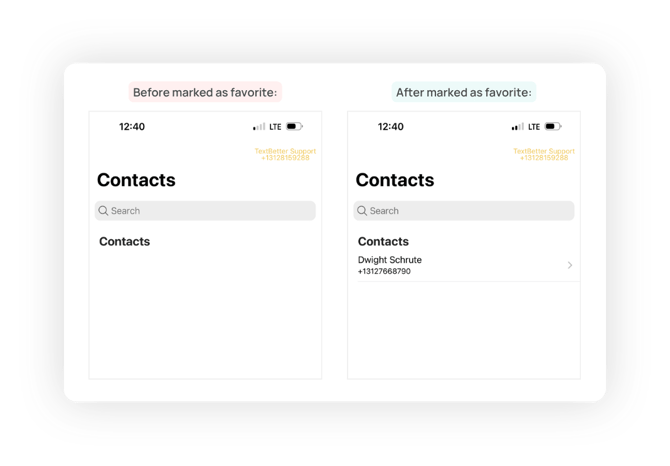
When you first open the Contacts page, your contact list may appear blank. This does not mean your contacts are missing.
Use the Search bar to find contacts in your phonebook. For example, searching a name like Michael will display matching contacts and conversations:
💡 Pro Tip for Keeping Contacts Visible
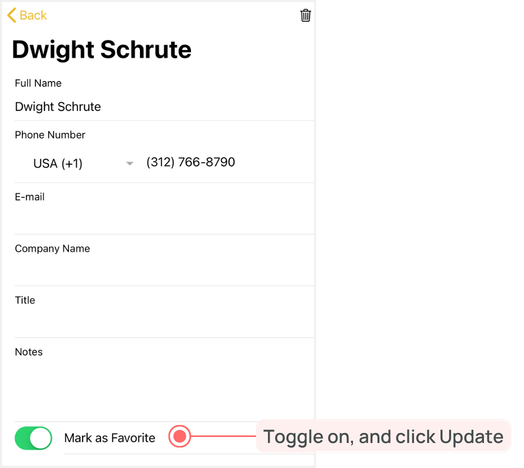
Contacts marked as ‘Favorite’ appear automatically on the Contacts page without needing to search for them first.

Naming Group Conversations
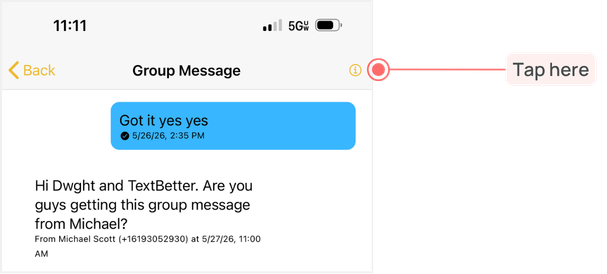
When you are added as a participant to a group message, but you did not create the group conversation, the conversation name will default to Group Message.
This name can be easily customized from within the mobile app.
How to Rename a Group Conversation
-
From the group conversation, tap the "i" icon at the top of the conversation.
- You will be brought to a new screen where you can view the group details.
- Enter a custom group name, and/or
- Review or manage the group participants as needed.
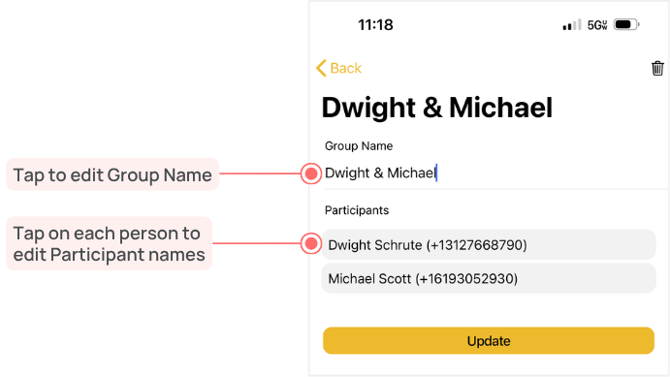
- Click Update
- Final result, after clicking update:
Creating Group Conversations in the Mobile App
You can create a new group conversation directly from the TextBetter mobile app.
How to Start a Group Conversation
- Step 1. Tap the Conversations icon in the bottom navigation menu.
- Step 2. Tap the pencil icon in the bottom-right corner.

- Step 3. You will be brought to the Start a Conversation page.
- Step 4. Search for a contact by entering a name or phone number, or select from the suggested contacts.
- Step 5. Tap the circle to the right of each contact you want to add.
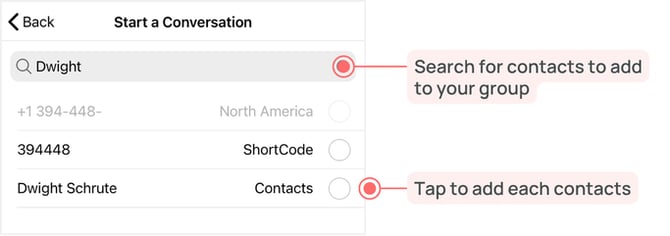
- Once selected, each contact will appear under Selected Contacts list (bottom of page).
- Repeat Steps 4 & 5 until all members of the group have been selected.

- Once all contacts have been selected, enter a name in the Name this Group field.
- Tap Start Conversation.

Once the group conversation is created, you will be brought to a new conversation window where you can type your message.
To send the message, enter your text and tap the paper plane icon on the right.
Sending Picture Messages in the Mobile App
You can send picture messages directly from an existing conversation in the TextBetter mobile app.
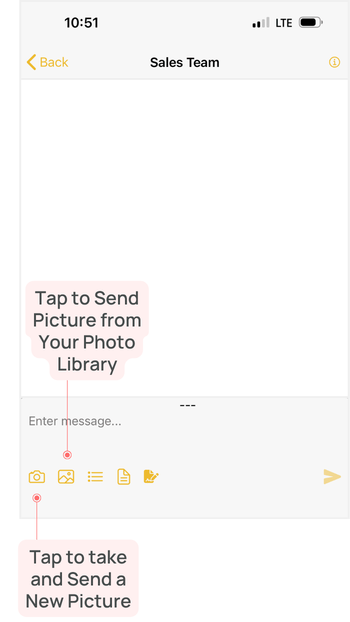
How to Send a Picture from Your Photo Library
From the conversation:
- Tap the picture icon in the bottom-left menu.
- Choose a photo from your phone’s photo library.
- Tap the paper plane icon on the right to send the picture message.
How to Take and Send a New Picture
From the conversation:
- Tap the camera icon in the bottom-left menu.
- Take a picture using your phone’s camera.
- Add the picture to the message.
- Tap the paper plane icon on the right to send the picture message.
💡Best Practices for Picture Messaging (Mobile App)
Use the camera icon when you want to take and send a new photo right away. This lets you include a picture message without first saving or searching for the image in your photo library.
Still having issues?
Contact Support@textbetterinc.com or call (800) 322-1112